In the article we are going to review new Payment Service Contracts (or Payment Gateway API) introduced in Magento 2. I will guide you through Command Interfaces and Service Classes which will help you to use it in further integrations with Payment Service Providers.
After reading this article you will:
- Understand Payment Gateway API
- Get best practices and examples of payment implementation
- Detailed overview of Gateway API classes and interfaces
Introduction
Magento team has introduced Payment Service Contracts or Payment Gateway API in Magento 2 Merchant Beta release. You can get the latest version of Magento 2 at the https://github.com/magento/magento2. In case you plan to implement Payment Integration for Magento 2 it may be useful to get hands on new Payment Gateway interfaces and classes – /vendor/magento/magento-payment/Gateway.
The assumption for /vendor/magento/ directory is that compose install command used for creating Magento 2 project.
Payment Method in Magento 1
There is a “Magento 1 way” where Payment Method class has 30+ methods with different responsibilities. Payment Method class usually implements Magento\Payment\Model\MethodInterface interface. The Payment class has a lot of responsibilities such as request preparation, validation, response processing, messages, including server calls to the 3rd party payment providers.
If you like to get better understanding how implementation of MethodInterface interface looks like, here is example of Authorize.net Payment class I appreciate the way it has been implemented in a past, however let’s be realistic – neither class nor interface could have 15+ responsibilities.
Payment or any other class should always follow Single Responsibility Principle – Tweet This
Payment Service Contracts
Payment Service Contracts which are located in a /vendor/magento/magento-payment/Gateway directory include both interfaces and classes. Payment Service Contracts are also known as Payment API or Payment Gateway API (API stands for Application Programming Interface).
Payment Gateway API is different from service contracts API (Data and Service interfaces) in other Magento 2 modules. Simply because Payment API aims to provide specific set of interfaces and extension points for your custom payment integration.
Payment API provides set of interfaces and extension points for your custom payment integration – Tweet This
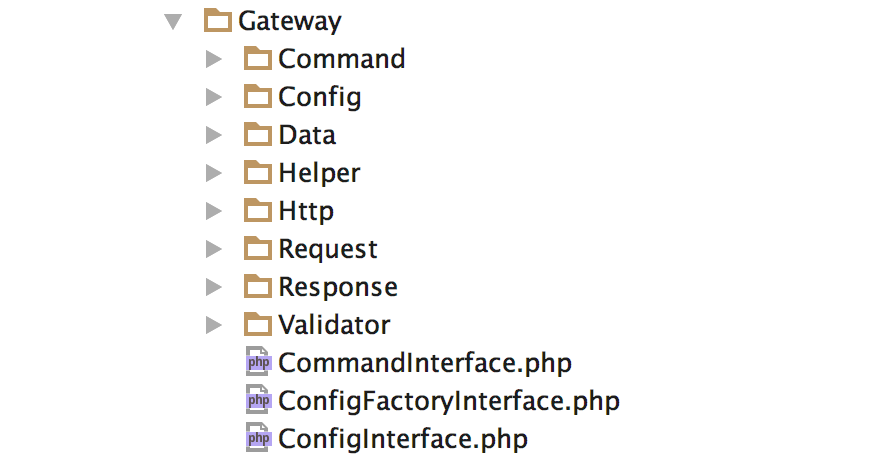
The Payment Gateway directory structure in Magento 2 looks like the following:

Pic 1. Magento 2 Payment Gateway Structure – /vendor/magento/magento-payment/Gateway
Payment Gateway classes and interfaces simplify and decrease amount of custom code for payment integrations in Magento 2 with Payment Service Providers (e.g. Realex, PayPal, Authorize.net etc.).
At the moment of writing this article I believe Payment Service Contracts are going to be improved for the Magento 2 Merchant GA release (Q4 2015). However, it does not mean that we should wait to start.
Update October 2016 update: Payment Gateway indeed improved and updated for Magento 2.1 release
Command Interfaces and Service Classes
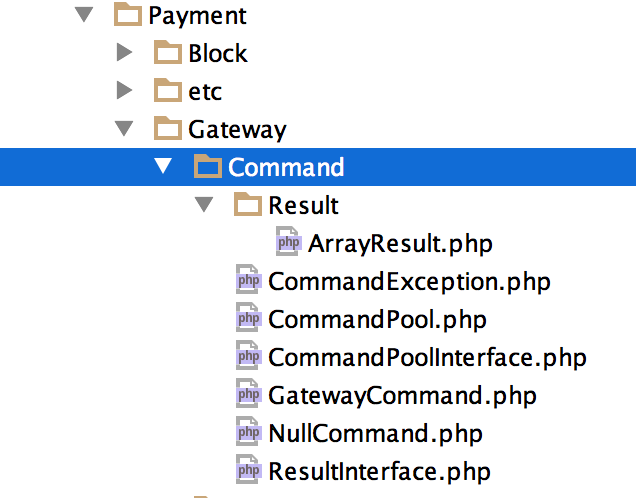
Let’s review Payment Gateway Command Interfaces and Service Classes. The Command directory consists of 2 command classes GatewayCommand and NullCommand, exception class, and Pool class with its Pool interface. In addition to this classes the ArrayResult class is used for providing data as an array.

My opinion is that both GatewayCommand and CommandPool service classes are most valuable here.
CommandPool class
CommandPool (Magento\Payment\Gateway\Command\CommandPool) class allows to group commands into executable set of command objects. These service classes is a great example of Command Pattern and Composite Pattern with the following benefits:
- Payment requests are encapsulated in objects. It enables more control and extension points via Magento 2 Plugins.
- Commands are configured via Dependency Injection. See
/vendor/magento/magento-payment/etc/di.xmlmodule configuration file.
Payment Capture Implementation
For example, the Pronko\Realex\Model\Remote class passes Payment Capture request preparation to the Pronko\Realex\Model\Remote\Request\Capture class. The Pronko\Realex\Gateway\Command\CommandPool class holds Capture command and other commands such as Authorize, Void and Refund.
The di.xml configuration for CommandPool and GatewayCommand classes might look like this:
[php]
<config xmlns:xsi=”http://www.w3.org/2001/XMLSchema-instance” xsi:noNamespaceSchemaLocation=”../../../../../lib/internal/Magento/Framework/ObjectManager/etc/config.xsd”>
<preference for=”Magento\Payment\Gateway\Command\CommandPoolInterface” type=”Magento\Payment\Gateway\Command\CommandPool” />
<virtualType name=”Pronko\Realex\Model\Remote\Command\CaptureGateway” type=”Magento\Payment\Gateway\Command\GatewayCommand”>
<arguments>
<argument name=”requestBuilder” xsi:type=”object”>Pronko\Realex\Model\Remote\Request\Capture</argument>
</arguments>
</virtualType>
<virtualType name=”Pronko\Realex\Gateway\Command\CommandPool” type=”Magento\Payment\Gateway\Command\CommandPool”>
<arguments>
<argument name=”commands” xsi:type=”array”>
<item name=”capture” xsi:type=”string”>Pronko\Realex\Model\Remote\Command\CaptureGateway</item>
</argument>
</arguments>
</virtualType>
<type name=”Pronko\Realex\Model\Remote”>
<arguments>
<argument name=”commandPool” xsi:type=”object”>Pronko\Realex\Gateway\Command\CommandPool</argument>
</arguments>
</type>
</config>
[/php]
The di.xml configuration file helps to achieve the following:
- Assigns
CommandPoolclass as a preference for theCommandPoolInterfaceinterface. - Creates
CaptureGatewayvirtual class. It allows to configureCaptureGatewayclass with custom requestBuilder argument. - Creates
CommandPoolvirtual class with Capture command. - The virtual
CommandPoolclass is passed to the commandPool argument.
Recommended to Read
2. Magento 2 Payment Gateway Configuration
3. Magento 2.0.6 Payment Changes
4. Magento 2 Payment Capture Request
The following class is an example of PaymentMethodInterface and MethodInterface interfaces implementation with CommandPool class usage:
[php]
namespace Pronko\Realex\Model;
use Magento\Payment\Model\InfoInterface;
use Magento\Payment\Gateway\Command\CommandPoolInterface;
use Magento\Payment\Gateway\CommandInterface;
class Remote implements MethodInterface, PaymentMethodInterface
{
/**
* @var \Magento\Payment\Gateway\Command\CommandPoolInterface
*/
protected $commandPool;
/**
* @var CommandPoolInterface
*/
public function __construct(CommandPoolInterface $commandPool) {
$this->commandPool = $commandPool;
}
/**
* @param InfoInterface $payment
* @param float $amount
* @return $this
* @api
*/
public function capture(InfoInterface $payment, $amount)
{
/** @var CommandInterface $captureGatewayCommand */
$captureGatewayCommand = $this->commandPool->get(‘capture’);
$captureGatewayCommand->execute([
‘payment’ => $payment,
‘amount’ => $amount
]);
}
/** CODE */
}
[/php]
Here we use Pronko\Realex\Model\Remote\Command\CaptureGateway class to send request to the Realex Payments Provider. Please note that $commandSubject argument passed to the CommandInterface::execute() method must be an array.
Let’s have a close look to a GatewayCommand::execute() method logic:
[php]
namespace Magento\Payment\Gateway\Command;
use Magento\Payment\Gateway\CommandInterface;
use Magento\Payment\Gateway\Http\ClientInterface;
use Magento\Payment\Gateway\Http\TransferFactoryInterface;
use Magento\Payment\Gateway\Request;
use Magento\Payment\Gateway\Request\BuilderInterface;
use Magento\Payment\Gateway\Response;
use Magento\Payment\Gateway\Response\HandlerInterface;
use Magento\Payment\Gateway\Validator\ValidatorInterface;
class GatewayCommand implements CommandInterface
{
/** CODE */
/**
* @param array $commandSubject
* @return null
* @throws \Exception
*/
public function execute(array $commandSubject)
{
// @TODO implement exceptions catching
$transferO = $this->transferFactory->create(
$this->requestBuilder->build($commandSubject)
);
$response = $this->client->placeRequest($transferO);
if ($this->validator) {
$result = $this->validator->validate(
array_merge($commandSubject, [‘response’ => $response])
);
if (!$result->isValid()) {
throw new CommandException(
__(implode(“\n”, $result->getFailsDescription()))
);
}
}
if ($this->handler) {
$this->handler->handle(
$commandSubject,
$response
);
}
}
}
[/php]
The execute() method holds all necessary operations required to process communication with Payment Service Provider:
- Request data is prepared by a Request Builder class based on Data passed from a
Pronko\Realex\Model\Remote::capture()method. - Request data is passed to a Transfer Factory class to create Transfer object.
- Transfer object is passed to a client to send request to a Payment Service Provider.
- Response is provided back from a client class.
- Response data is validated by Validator object (optional).
- Response data is processed by Handler object. Handler classes are used to prepare Payment object (optional).
Validation
It is important to mention that Magento\Payment\Gateway\Validator\ValidatorInterface interface is used to provide validation of the response from Payment Service Provider. The request data should be validated as part of Magento\Payment\Model\MethodInterface::validate() method call. There is a Magento\Payment\Gateway\Validator\CountryValidator class used in case there is a Country limitation for Payment integration.
Summary
In this article we reviewed Command Interfaces and its Service Classes from Payment Service Contracts. As an example we configured CommandPool and CaptureGateway command class for handling Payment Capture command in a Payment class. The GatewayCommand class holds common communication logic with Payment Service Providers.
I highly recommend to use Payment Gateway API as a core framework for any payment integration. You are welcome to expect overview and examples of other parts of Magento 2 functionality (including Payment Service Contracts).
Read my payment article on how to configure your own Payment Method Adapter class in Magento 2.
I am looking forward for your feedback and any comments on how I can share more valuable to you information.
Leave a Reply
You must be logged in to post a comment.